Gmini MagicBook Z6 does not turn on
Attention: the authors are not responsible for the malfunctions of the e-books, tablets, smartphones and other mobile devices, which can appear as a result of using this information. Everything you do is at your own risk!
The main malfunction of e-books Gmini MagicBook Z6, DNS AirBook EB601, Digma e605, Digma e625 is lack of reaction to pushing buttons. Probably, when the charger will be connected the power lamp will be blinking. The device just does not turn on. It mostly happens whe the e-reader is absolutely discharged and then lays a few weeks on the shelf.
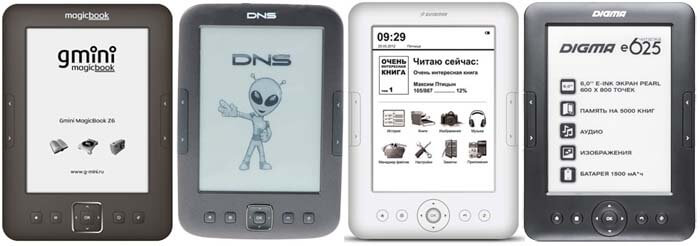
When you keep these models of e-readers discharged for a long time the integrity of their software is violated for unknown reasons. In order to reestablish the operability of the device you need to update the firmware. And there the difficulties start.
To begin with, you should download to the computer with the operating system Windows XP - Windows 8 the firmware from the official site Gmini, Digma or DNS and to unpack it into any place you want.
Then connect the turned off device to the computer with mini-USB cable and you should press and hold the button "Ok" before. A new device will be found in the system. If it does not happen then repeat the procedure but hold the button of the joystick "down". If it does not happen again then open the compartment for memory card. To the right you will find two holes.
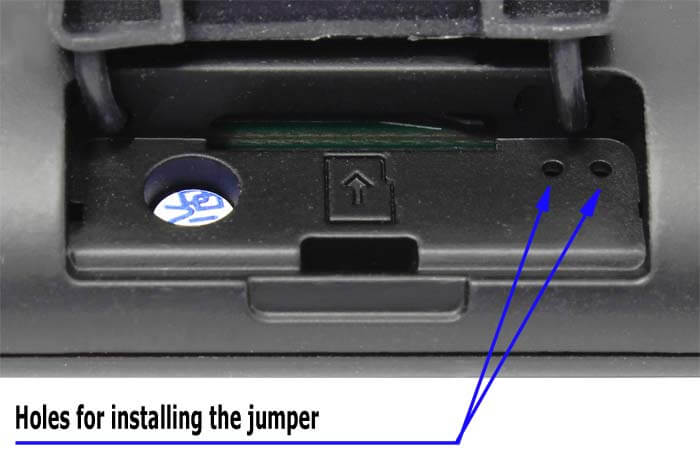
Connect the e-reader to the computer with the cable. Press and hold the button "Ok". Insert a wire or a piece of paper clip into these holes and hold it so that to short-circuit the contact pads which are situated on the device board under the holes and while holding the button and the jumper (probably, you will need somebody's help) press with a thin thing on "Reset". If everything is done correctly then the computer will find an unknown device.
Install the drivers of the device from the file of the firmware. Then do everything according to the instruction for the firmware. For successful reestablishing of an e-reader you should start at least 3 utilities from the complect one by one:
- RKEraseTool – for formating the internal memory
- RKBatchTool – for changing the firmware
Pay attention: after updating the firmware with using RKBatchTool the device starts working, reacting on the buttons but nothing changes on the screen. It is ok. Continue updating the firmware. You should turn off the book by long press of the power button, start the utility SpiFlashTool, then press the button "Ok", turn on the device and continue updaring the firmware.
- SpiFlashTool – for recording the screen settings file Waveform.
Why do we speak about 4 models of e-books at the same time? Because these devices are very similar in location of control keys and characteristics.
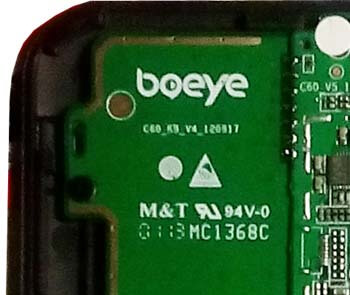
Let's try to remove the back cover of any of these e-readers. Pay attention: it does not work on latches like most of the e-readers. In order to remove it you should unscrew one screw, which is situated in the compartment for memory card, put the device (the screen should be down) on the table and do not forget to cover the table with some dense cloth before. Then you should move the back cover away from yourself. We will see that there is a logotype boeye model C60 in the top left corner on the board. So "the insides" of these e-books are the same and they are made by Chinese company Shenzhen Boeye Technology CO., LTD. It means that the firmwares of these e-readers are interchangeable and you can "make" Gmini MagicBook Z6 from Digma e625 just by changing the firmware.
This way you can choose the most comfortable software for your e-book.
If mini-USB connector is damaged.
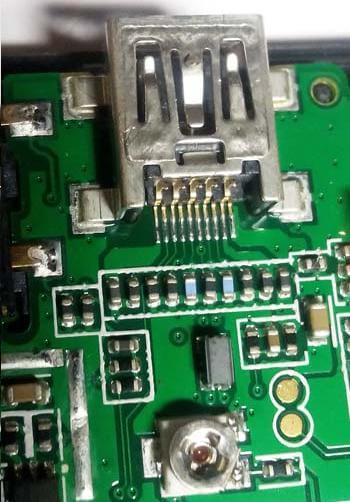
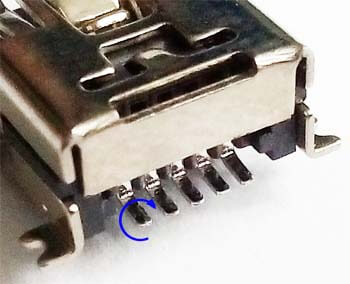
If visual inspection detected damage to the mini-USB connector an an e-reader dos not charge, you should replace it. Pay attention: Gmini MagicBook Z6, DNS AirBook EB-601, Digma e605, Digma e625 have 10-pin connector installed on the board. It is possible to buy it there.
You can also use a standard 5-pin connector but you have to remake it this way: every pin should be rotated through 90 degrees so that they touched the board with the butt end. You should solder through one pin skipping even pins on the board, they are not used. So, the first (left) pin of the connector should be connected with the first (left) contact pad on the board of the device, the second with the third, the third with the fifth, the fourth with the seventh and the fifth with the nineth. The work is very thin and requires skills and good instrument.
Next

